
RuneClick has full mod support. A mod can add a whole new skill with its own items, recipes and art, swap out the game’s art, retune the numbers, or run its own GDScript code. When it’s ready, one button in the game puts it on the Steam Workshop.
This guide builds a mod from start to finish using the Pottery template that comes with every copy of the game. Every field and file name here matches what the game actually reads.
What you need
- RuneClick on Steam (Windows).
- A text editor that saves plain text. VS Code, Notepad++ or plain Notepad all work.
- For art, an image editor that saves transparent PNGs.
You don’t need to install Godot. JSON mods are just text files, and script mods are plain GDScript files that the game compiles itself when it loads them.
Where mods live
Mods are folders inside %APPDATA%\RuneClick\mods\, one folder per mod. The easy way
there is Settings > Mods > Open Mods Folder in the game.
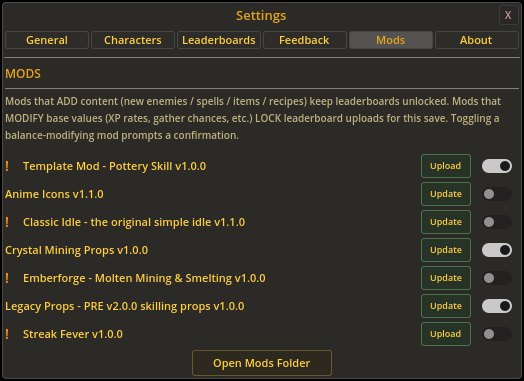
The Mods tab lists every mod the game found, both your local folders and your Workshop subscriptions, with a switch to turn each one on or off. Mods that include scripts get an orange ! next to their name. Changes take effect the next time you start the game.
If a local mod and a Workshop mod share the same mod_id, the local one wins. That’s
handy while you work on an update to something you’ve already published.
Step 1: Copy the template
On first launch the game creates a _template_mod folder in your mods folder. It’s
a complete, working mod that adds a small Pottery skill, and it starts switched off.
Copy the folder, rename the copy to something of your own (say my_first_mod), and
work in the copy. The template itself can’t be uploaded to the Workshop, so it’s
always there to look back at.
my_first_mod/
  mod.json              required: who you are and what the mod is
  mod_main.gd           optional: GDScript code
  preview.png           optional: the Workshop thumbnail
  data/
    skills.json         new skills
    items.json          new items
    recipes.json        new recipes
    overrides.json      changes to existing values
  assets/
    character/pottery/  the skill's animation frames
    props/              the scene prop
    icons/skills/       the skill icon
    icons/items/        item icons
Every file except mod.json is optional, so delete whatever your mod doesn’t use.
Step 2: Fill in mod.json
{
  "mod_id": "my_first_mod",
  "name": "My First Mod",
  "author": "YourName",
  "version": "1.0.0",
  "description": "Adds Pottery, a new production skill.",
  "game_version_min": "3.1.1",
  "load_order": 100
}mod_id,name,author,versionanddescriptionare required and can’t be empty. If one is missing, the game skips the mod.mod_iduses lowercase letters, numbers and underscores only, and it has to be unique. It’s also the prefix for all of your item and recipe IDs (more on that below).game_version_minis optional. Older versions of the game won’t load the mod.load_orderdecides who goes first when mods touch the same things. Lower numbers load first, and the default is 100.nameanddescriptionbecome your Workshop title and description when you upload.
Step 3: Add a skill
data/skills.json adds skills, keyed by the name players will see:
{
  "Pottery": {
    "category": "PRODUCTION",
    "xp_per_keyboard": 7,
    "xp_per_mouse": 4,
    "description": "Mold clay and fire it into pots and trinkets.",
    "color": "#B5651D"
  }
}categoryisGATHERINGorPRODUCTION. A gathering skill pulls items out of the world, like Woodcutting. A production skill turns items into other items, like Smithing.xp_per_keyboardandxp_per_mouseset how much XP each key press and each click is worth.coloris the skill’s XP bar color.
A gathering skill needs at least one item with a drop_weight above 0. A production
skill needs at least one recipe.
Step 4: Add items
data/items.json holds your items. Here’s the template’s raw clay and the pot you
make from it:
{
  "clay": {
    "display_name": "Clay",
    "skill": "Pottery",
    "category": "RESOURCE",
    "tier": 1,
    "level_required": 1,
    "drop_weight": 100,
    "sell_value": 2,
    "description": "A lump of raw clay, ready to be shaped."
  },
  "clay_pot": {
    "display_name": "Clay Pot",
    "skill": "Pottery",
    "category": "EQUIPMENT",
    "tier": 1,
    "level_required": 1,
    "sell_value": 25,
    "description": "A fired clay pot. Holds a small XP bonus when worn.",
    "equip_slot": "ACCESSORY",
    "applies_to_skill": "Pottery",
    "bonuses": { "bonus_xp_percent": 5, "bonus_gather_chance": 7 }
  }
}- Every item needs
display_name,skill,category,tier,level_requiredandsell_value. categoryisRESOURCE,MATERIAL,EQUIPMENTorCONSUMABLE.drop_weightmakes an item gatherable. Higher means more common, and 0 (the default) means it never drops.buy_priceputs the item in the General Store.- Equipment needs an
equip_slot(TOOLorACCESSORY), the skill itapplies_to_skill, and itsbonuses. - Consumables need
buff_effectsand abuff_duration, counted in inputs (key presses and clicks), not seconds. The template’s Mug of Tea gives{ "bonus_xp_percent": 2 }for 40 inputs.
IDs get your prefix. In the game, clay becomes my_first_mod:clay. That keeps
two mods from fighting over the same name. When you refer to your own items, use the
full ID. Base game items keep their plain IDs, like oak_log or copper_ore.
Step 5: Add recipes
data/recipes.json is how a production skill makes things:
{
  "fire_clay_pot": {
    "skill": "Pottery",
    "level_required": 5,
    "inputs": {
      "oak_log": 2,
      "my_first_mod:wet_clay": 1
    },
    "inputs_required": 8,
    "output_id": "my_first_mod:clay_pot",
    "output_quantity": 1,
    "description": "Fire a wet clay shape in a small kiln stoked with oak logs."
  }
}inputsare the items used up, with how many of each. Mix your items and base game items freely.inputs_requiredis how many key presses and clicks it takes to finish one.output_idandoutput_quantityare what you get.
Copying the template? It uses template_mod: in its IDs, so swap that for your own
mod_id everywhere.
Step 6: Add art
All art is pixel art on a transparent background, saved as PNG.
| What | Where | Size |
|---|---|---|
| Skill animation | assets/character/pottery/pottery_01.png, _02, … |
128x128 |
| Skill icon | assets/icons/skills/pottery.png |
48x48 |
| Item icons | assets/icons/items/clay.png (the ID without your prefix) |
48x48 |
| Production skill prop | assets/props/pottery_prop.png |
128x128 |
| Gathering item prop | assets/props/clay_prop.png |
128x128 or 128x256 |
| Workshop thumbnail | preview.png in the mod folder |
520x520 |

Folder and file names use the skill’s name in lowercase. Use as many animation frames
as you like: the game loads _01, _02 and so on until a number is missing, and plays
them at the game’s action speed (9 frames a second by default). The template’s
pottery animation has five.
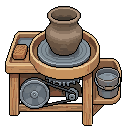


To animate a prop, number it the same way: pottery_prop_01.png, _02 and so on.
Step 7: Turn it on
Start the game, open Settings > Mods, switch your mod on, and restart. Your skill shows up in the skill grid with everything else.
A good place to try it out is a sandbox character. Every PC has two of them, and they never touch the leaderboards, so you can test freely.
If your mod doesn’t show up, the game says why in its log file at
%APPDATA%\RuneClick\logs\godot.log. Search it for [ModLoader]: a missing field, a
mod_id with a capital letter, or a stray comma in a JSON file are the usual
suspects. Change one thing at a time and it’s easy to spot what broke.
Swapping the game’s art
You can also replace art that’s already in the game, no data files needed. Put your
file in your mod at the same path and name as the game’s own file, like
assets/props/<item id>_prop.png for a resource node, and the game uses yours while
the mod is on.
For animations, once your mod has frame _01, the whole animation comes from your
mod, and it can have a different number of frames than the original. If your
replacement is a different size or sits differently, line it up from mod.json:
"prop_transforms": {
  "copper_ore": { "offset": [0, -8], "scale": [1.0, 1.0] }
}
Most scene props work this way: resource nodes, skill stations and enemies. A few special ones can’t be replaced yet, like the Thieving stall frames and the Construction build stages. Not sure what a file is called? Ask in the Discord.
Changing existing values
data/overrides.json changes things that already exist, in the base game or in
another mod:
{
  "items": { "oak_log": { "sell_value": 5 } },
  "recipes": { "smelt_bronze_bar": { "inputs_required": 4 } },
  "skills": { "Woodcutting": { "xp_per_keyboard": 8 } },
  "constants": { "BASE_GATHER_CHANCE": 0.35 }
}
Overrides run after every mod’s content has loaded, so they can reach items from other
mods too. When two mods override the same thing, the higher load_order wins.
The constants you can change are XP_BASE, XP_GROWTH_RATE, XP_GROWTH_RATE_LATE,
XP_CURVE_BREAKPOINT, BASE_GATHER_CHANCE, LEVEL_GATHER_BONUS, MAX_GATHER_CHANCE,
BUY_PRICE_MULTIPLIER, BURN_RATE_AT_COOK_LEVEL, MASTERY_LEVEL_OFFSET and
RARE_VARIANT_CHANCE.
About leaderboards. Mods that add content (new skills, items and recipes) and art mods keep the leaderboards open. Mods that change base values, like XP rates, gather chances or item values, lock leaderboard uploads for that save, and the game asks you to confirm before you turn one on. That’s another reason to test on a sandbox character.
Script mods
For anything JSON can’t do, add a mod_main.gd to your mod folder. It has to
extend Node, and the game adds it once all the mod data has loaded:
extends Node

func _ready() -> void:
	SkillManager.level_up.connect(_on_level_up)
	print("[MyFirstMod] Loaded!")

func _on_level_up(skill_name: String, new_level: int) -> void:
	Bank.add_gold(new_level * 10)
	print("[MyFirstMod] Level up bonus: +%d gold" % (new_level * 10))
A script can connect to the game’s signals, read and change the data, and add its own nodes and UI. Some useful signals:
SkillManager.level_up(skill_name, new_level)SkillManager.resource_gathered(skill_name, item_id, quantity)SkillManager.production_completed(skill_name, recipe_id, output_id, quantity)SkillManager.rare_drop_found(skill_name, item_id)Bank.resource_changed(item_id, new_quantity)Bank.gold_changed(new_total)Bank.equipment_changed()
And the data lives in ModLoader.skills, ModLoader.resources and
ModLoader.recipes.
Scripts run with the same access to your computer as the game itself, which is why script mods get the ! in the Mods tab. Only install script mods from people you trust, and if you publish one, say what it does.
Publish to the Workshop
- Check
mod.json: a uniquemod_id, a clearnameanddescription, and aversion. - Add a
preview.png(520x520) to the mod folder. It becomes your Workshop thumbnail. - With Steam running, open Settings > Mods and press Upload next to your mod.
- The first time, Steam may open its Workshop legal agreement. Accept it, or Steam keeps your item hidden.
Your mod goes up public, tagged as a mod (and as a script mod if it has a
mod_main.gd). After that the button says Update: raise the version in
mod.json, press it, and the new version goes out with the version number as its
change note. Screenshots and a longer write-up can be added on the item’s Workshop
page in Steam.
What you make is yours. By publishing a mod for RuneClick, you let me use and adapt it inside RuneClick, and you get credited if that ever happens. That’s the whole deal.
Stuck?
The template’s own README.md has the full field list, and the Discord is the place
to ask, show off what you’re making, and find people to test it. I’d love to see what
you build.